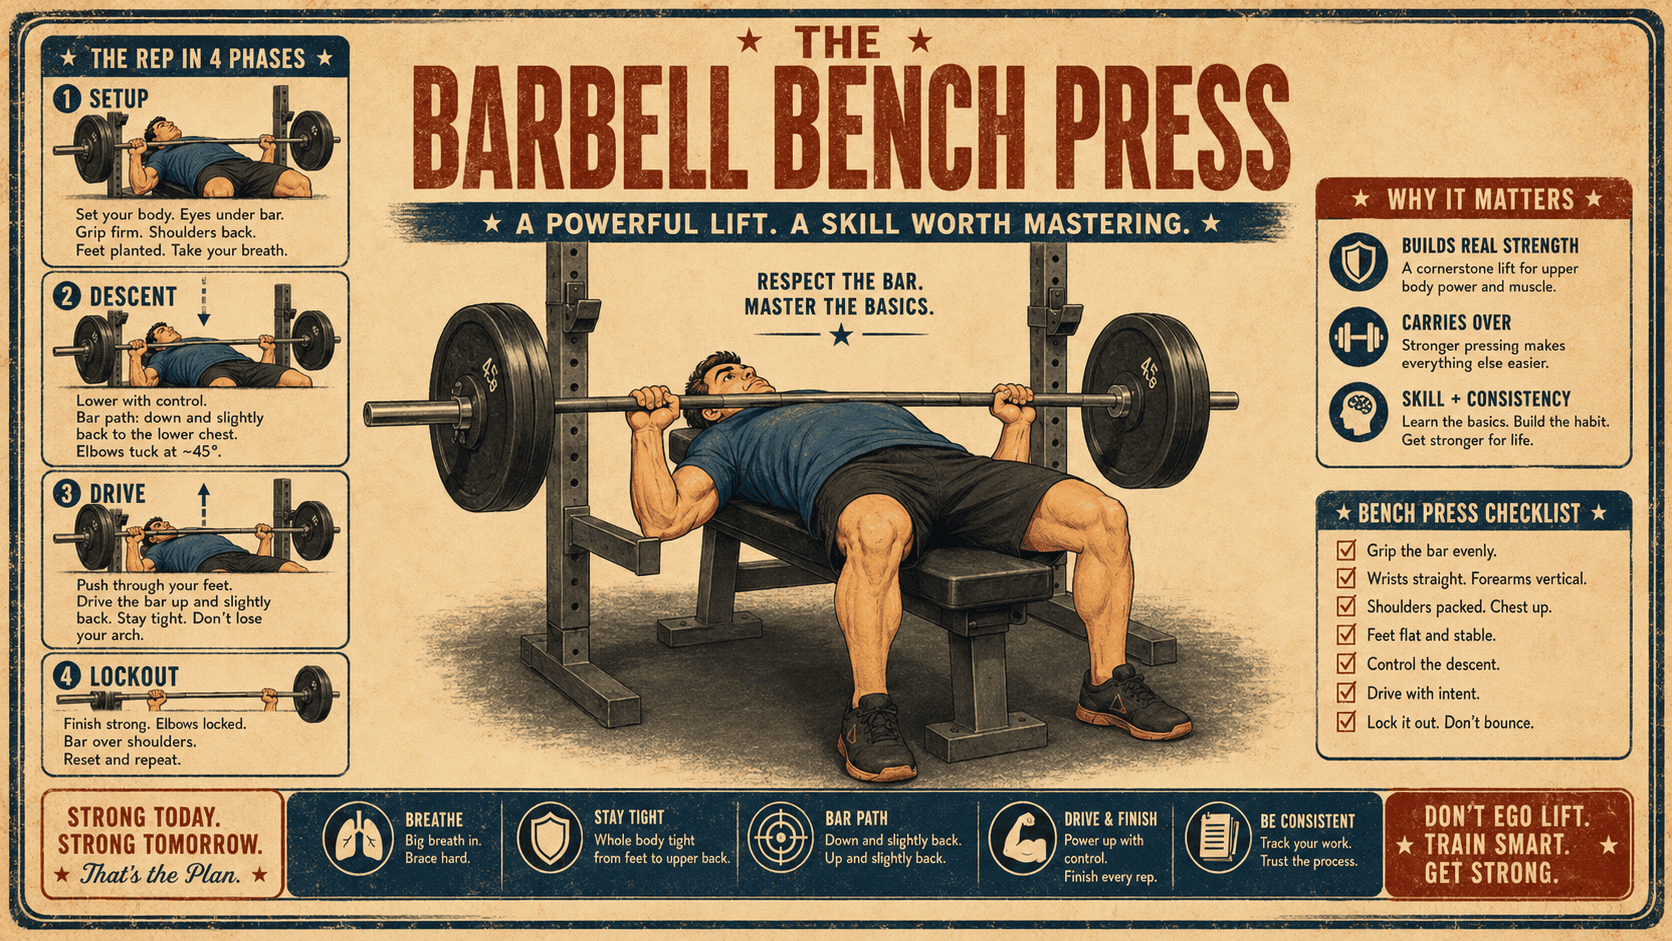
The Barbell Bench Press
The bench press is the lift most people picture when they hear the word “lift,” and it’s also the lift most likely to put you in a bad spot if you treat it casually. A loaded bar hovers over your face for every rep, and you can’t step out from under it the way you can in a squat or drop it to the ground the way you can in a deadlift. So it pays to learn the mechanics before you load the bar.
I like the way Mark Rippetoe teaches how to do the movement in Starting Strength: Basic Barbell Training (3rd ed., 2011). I’ll do my best to explain what he teaches here.
Why bench at all
The bench press trains the pecs, front delts, and triceps as the primary movers. The upper back, lats, and forearms work isometrically (holding their length under tension) to keep position and transmit force (Rippetoe, Starting Strength 3e, Ch. 5, Figure 5-12). The pecs and front delts drive the bar off the chest; the triceps finish elbow extension to lockout. The bigger back muscles - traps, rhomboids, lats - hold the shoulder blades pinned to the bench so the arms have something stable to push against.
Rippetoe is careful to distinguish “training the bench press” from “putting the biggest possible number on the bar.” A very wide grip, a bench shirt, and a heaved or bridged technique can move much more weight than a strict touch-and-go with a moderate grip, but they do it by shortening the range of motion and shifting work away from the muscles you’re trying to train. I think for most of us who are trying to get stronger, the goal is the opposite: a full range of motion that loads the pecs and triceps through their full range so the numbers in your training log mean something over time.
Greg Nuckols at Stronger By Science has covered how grip width, arch, and bar path change the tradeoff between competition efficiency and general training. His framing is compatible with Rippetoe’s: a wider grip and bigger arch can help move more weight by shortening the range of motion, while a more moderate grip and longer range may make more sense for non-meet-focused training.
The equipment, briefly
You want a standard power bar (28-29 mm diameter) and a 17-inch bench (flat, set inside a power rack, or with built-in uprights). Rippetoe is opinionated about benches: he thinks the industry has spent decades cutting corners on them, and that a serious gym should buy competition-spec equipment for safety and consistency (Ch. 5, “The Equipment”).
Knurl rings: the lines on the bar
Look at the bar. Somewhere in the knurled section near each sleeve, you’ll see one or two thin smooth rings cut into the knurl. These aren’t decorative. They’re calibration rings for grip width, and once you know what they mean, you never have to “feel out” your grip again.
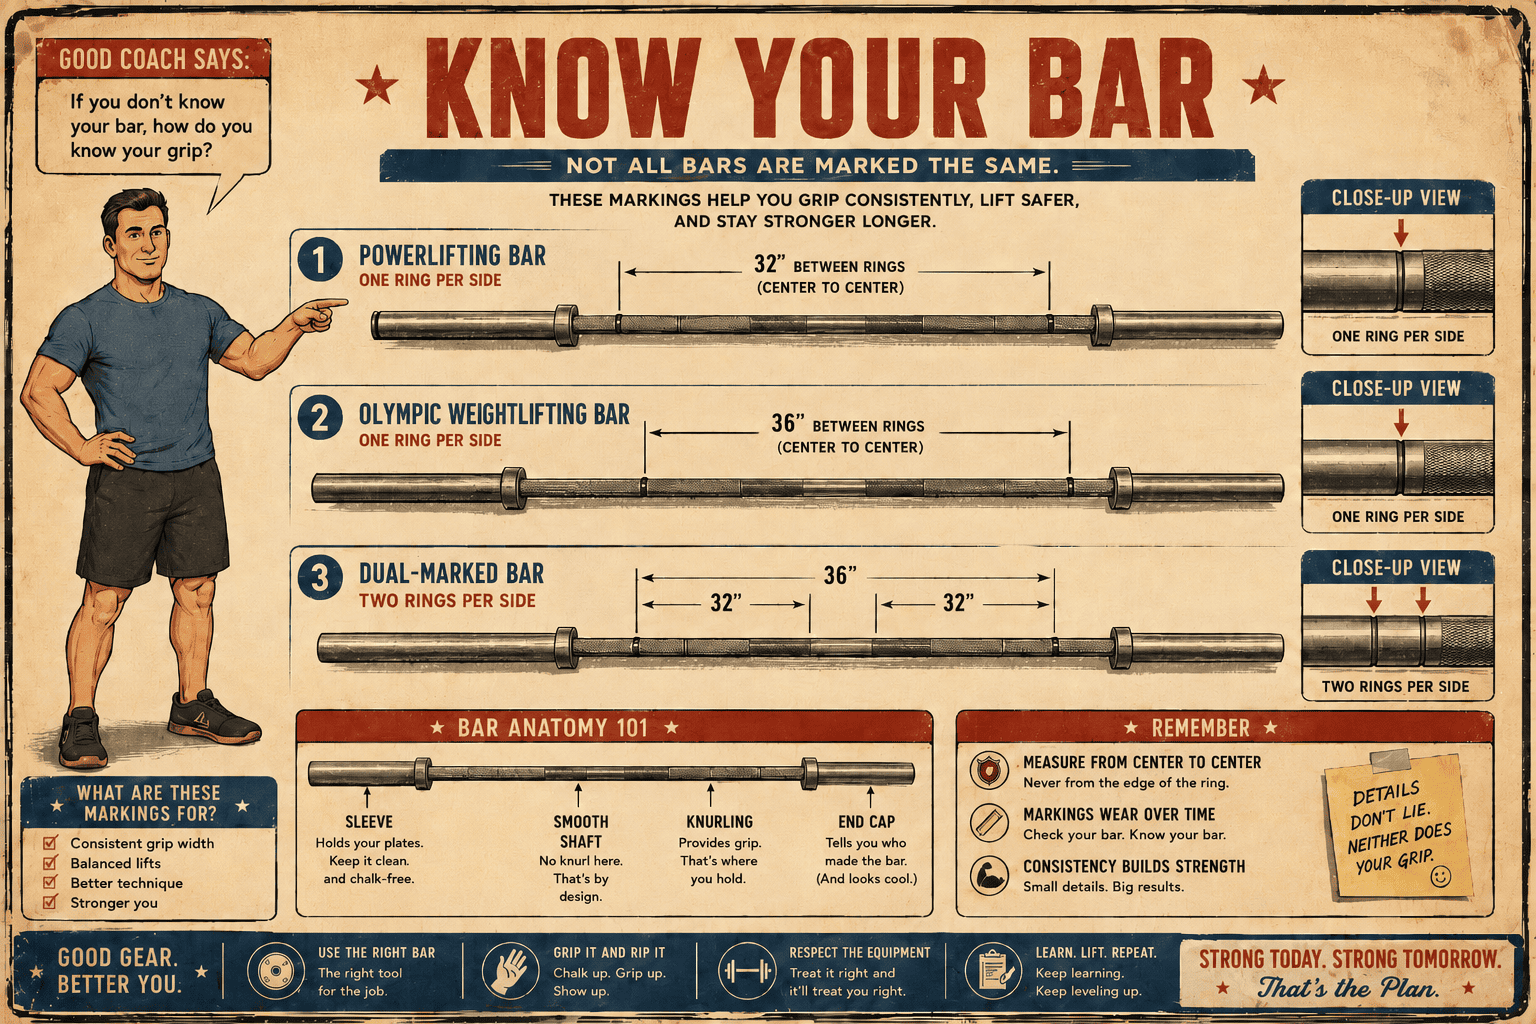
Three patterns are common:
- One ring per side, 32 inches apart (810 mm). This is a powerlifting bar. The ring marks the IPF legal maximum grip width for the bench press. Rippetoe mentions this spacing in the chapter (Ch. 5, “The Equipment”).
- One ring per side, 36 inches apart (910 mm). This is an Olympic weightlifting bar. The ring is the snatch-grip reference for IWF lifting.
- Two rings per side. A dual-marked bar with both sets of rings. The inner ring is at 32 inches (powerlifting); the outer ring is at 36 inches (weightlifting). A lot of modern multipurpose bars look like this so they serve both communities.
If the bar in front of you has a single ring per side and you can’t tell the spacing by eye, the heuristic is: powerlifting gyms own power bars, CrossFit gyms own weightlifting bars or dual-marked bars, and commercial gyms own whatever was cheapest. If you can’t tell, measure once with a tape and remember.
A few practical notes that go beyond the book:
- Bench height. IPF benches are 42 to 45 cm high, which is roughly 17 inches, and Rippetoe uses a 17-inch bench as the standard recommendation. If your gym uses a taller cushioned bench, your feet may not reach the floor flat-footed, and you’ll need plates or a small block under each foot.
- J-cups. If the J-cups are set too high, you waste shoulder range pressing the bar up to clear them and your scapulae loosen on every rerack. If they’re too low, you can’t lock out fully to rack. Set them so a locked-out arm just clears the hook.
- Safety pins or arms. If you bench alone, you must bench inside a power rack with the pins set just below chest level so a stuck bar can be dumped onto them. This is the same point Rippetoe makes in the racking-rules section, and it’s the most important sentence in the chapter. CPSC incident data and forensic case reports repeatedly describe fatal bench-press asphyxia from barbells compressing the neck or chest, often with no spotter or no effective safety bars.
Setup
The setup is where most of the lift is decided. Once the bar is moving, you can’t fix a loose upper back or a foot that’s in the wrong place.
Eye position and bar reference
Lie down so your eyes are just south of the bar, looking up at it (Ch. 5, “Learning to Bench Press”). The point of this position isn’t aesthetic; it sets the geometry for unracking. If you slide too far down the bench, you have to push the bar through a long horizontal moment arm to get it over your shoulders. (Moment arm is the sideways distance from the joint you’re working - here, the shoulder - to where the load sits; the longer it gets, the more torque the muscles around that joint have to fight.) That’s the position you don’t want to be in under a heavy weight.
Once the bar is over your shoulders, find a feature on the ceiling - a tile seam, a light fixture, a sprinkler head - directly above the bar. That feature is your reference for the rest of the set. Rippetoe’s “ceiling trick” is to stare at the fixed reference and let the bar move through your field of view; don’t track the bar with your eyes. Hand-eye coordination drives the bar back to where your gaze is fixed. He claims this works for about 90 percent of novices the first time they try it, and in my experience he’s right.
Alan Thrall teaches a similar start-position, touch-point, and bar-path framework in his Starting-Strength-style bench material; the ceiling-reference cue is easiest to source directly to Rippetoe.
Grip
The grip is 22 to 24 inches between the index fingers for most lifters, give or take based on shoulder width (Ch. 5, “Hands and grip”). The bar sits on the heel of the palm, directly over the bones of the forearm. That keeps the wrist straight, so press force travels in a straight column from the shoulder through the elbow and wrist to the bar.
Two non-negotiables from the book:
- Thumbs around the bar. Rippetoe is blunt about this: fatal bench-press asphyxia is rare but real, and CPSC-linked forensic reports document multiple deaths from barbells compressing the neck or chest. The thumbless grip lets the bar roll out of the hand onto the throat or face. No spotter reacts fast enough. Use a closed grip every set, every warm-up, every rep.
- Set the grip by pronation, not by knuckle line. Lay the bar on the open hand with the thumb pointing toward your feet, then rotate the hand into pronation and close the grip around it. This puts the bar over the forearm bones and minimizes the moment arm at the wrist. Rippetoe explains the same setup in the press chapter (Ch. 3).
Use the knurl rings to set the same grip every time. This is the part you should steal from the equipment section above. On a power bar (rings 32 inches apart), a 22-24 inch grip puts each index finger 4-5 inches inside the ring. Measure once, pick the nearest repeatable landmark that puts your index fingers there, and put your hand in the same spot every set. The bar tells you where your hands belong; you don’t have to measure, count knurl lines, or eyeball it against the center smooth section. If your gym’s bar has two rings per side, use the inner ring (32 inches) as your reference. If it has only the outer ring at 36 inches, you’ll be gripping a couple inches further inside that ring than you would inside a power-bar ring. Same grip width either way; different reference.
Grip width is the parameter most contested across coaches. Rippetoe’s medium grip (22-24 inches, forearms vertical at the chest) is the training default. Powerlifters typically grip wider, up to the 32-inch competition maximum, because a wider grip shortens the bar path. Greg Nuckols has written about bench grip width: wider is often stronger for powerlifting, a more moderate grip may make more sense for hypertrophy, and acute EMG differences are probably smaller than common gym lore suggests. For a novice the choice is easy: take Rippetoe’s default and revisit it only if a coach you trust gives you a concrete reason to change.
Upper back, arch, and feet
The upper back has to be the platform you push against. Sit on the bench, pinch your shoulder blades together hard, lift your chest, and lie back without losing either. From the side you should look bowed, with your upper back and glutes touching the bench, your head neutral, and a hand-sized gap under your lower back (Ch. 5, “Upper back” and “Lower back, hips, and legs”).
Two pieces of jargon are worth learning, because every coach uses them:
- Scapular retraction is pinching the shoulder blades together. This is what makes the platform.
- Scapular depression is pulling the shoulder blades down toward your hips. Done together with retraction, the shoulder blades end up tucked under the rib cage, and the chest sits higher off the bench. The shorter range of motion is a side effect; the safety benefit is that the shoulder starts from a more stable, less flared position.
Rippetoe doesn’t use the word “depression” in the chapter, but Figure 5-21’s “imagine a hand between your shoulder blades” cue points toward the same pinned, chest-up position. Juggernaut Training Systems explicitly teaches the shoulder blades down-and-back, and Squat University’s Aaron Horschig uses similar shoulder-blade positioning in bench shoulder-pain material, with more caveats around over-cueing it in other contexts.
Feet flat on the floor, shins close to vertical, knees roughly over the ankles. The feet aren’t just there for balance; they’re the floor end of a chain that runs from the floor through the hips and lower back into the arch and braces the chest in its high position. Rippetoe is careful to draw a line between using the legs and “bridging.” Bridging is when the glutes leave the bench so the hips can heave the bar; that’s cheating, and it changes the lift mechanically by shortening the range of motion and giving the hips a vote in a movement that’s supposed to be the upper body’s job. Glutes stay on the bench. Always.
Breath
Take a big breath before the rep starts, with the elbows locked overhead. Hold it through the descent and the drive. Exhale at lockout, or, if the set is short enough, hold a single breath for the whole set (Ch. 5, “Breathing”).
Two reasons the timing matters. First, once the pecs contract and the rib cage loads, you can’t get a full inhale; the bar will pull the chest down. Second, the held breath is what makes the rib cage rigid enough to transmit pec force into the bar without losing it to chest compression. It’s the same Valsalva maneuver (holding a breath against a closed throat so the trunk pressurizes from the inside) used in the squat and deadlift. Here the rigidity holds the chest up rather than the spine.
If you can breathe in the middle of a rep, you aren’t tight enough.
Descent
The descent is the part beginners ignore. They think of the bench press as the upward half, treat the lowering as a transit, and the bar lands wherever it lands. This is the single biggest fixable problem in novice benches.
Where the bar touches
The bar should touch the chest a few inches below the clavicles, somewhere around the middle of the sternum (Ch. 5, “Learning to Bench Press”). The exact spot depends on your anthropometry (your build - limb lengths, torso shape, chest depth) and how high you can get your chest. For someone with a flexible thoracic spine and a real arch, the touch point will be lower, toward the bottom of the sternum, because the chest itself is angled steeper.
Rippetoe’s spotter trick at the start of learning is to have the spotter touch the right spot on your sternum a few times with a finger so you have a tactile target. If you’re alone in a rack, his cue is to unlock the elbows out to the sides at the top, then let them drift toward the feet a little on the way down. Do this lightly. The net result is a bar path that diagonals down the chest, not a straight vertical drop onto the throat.
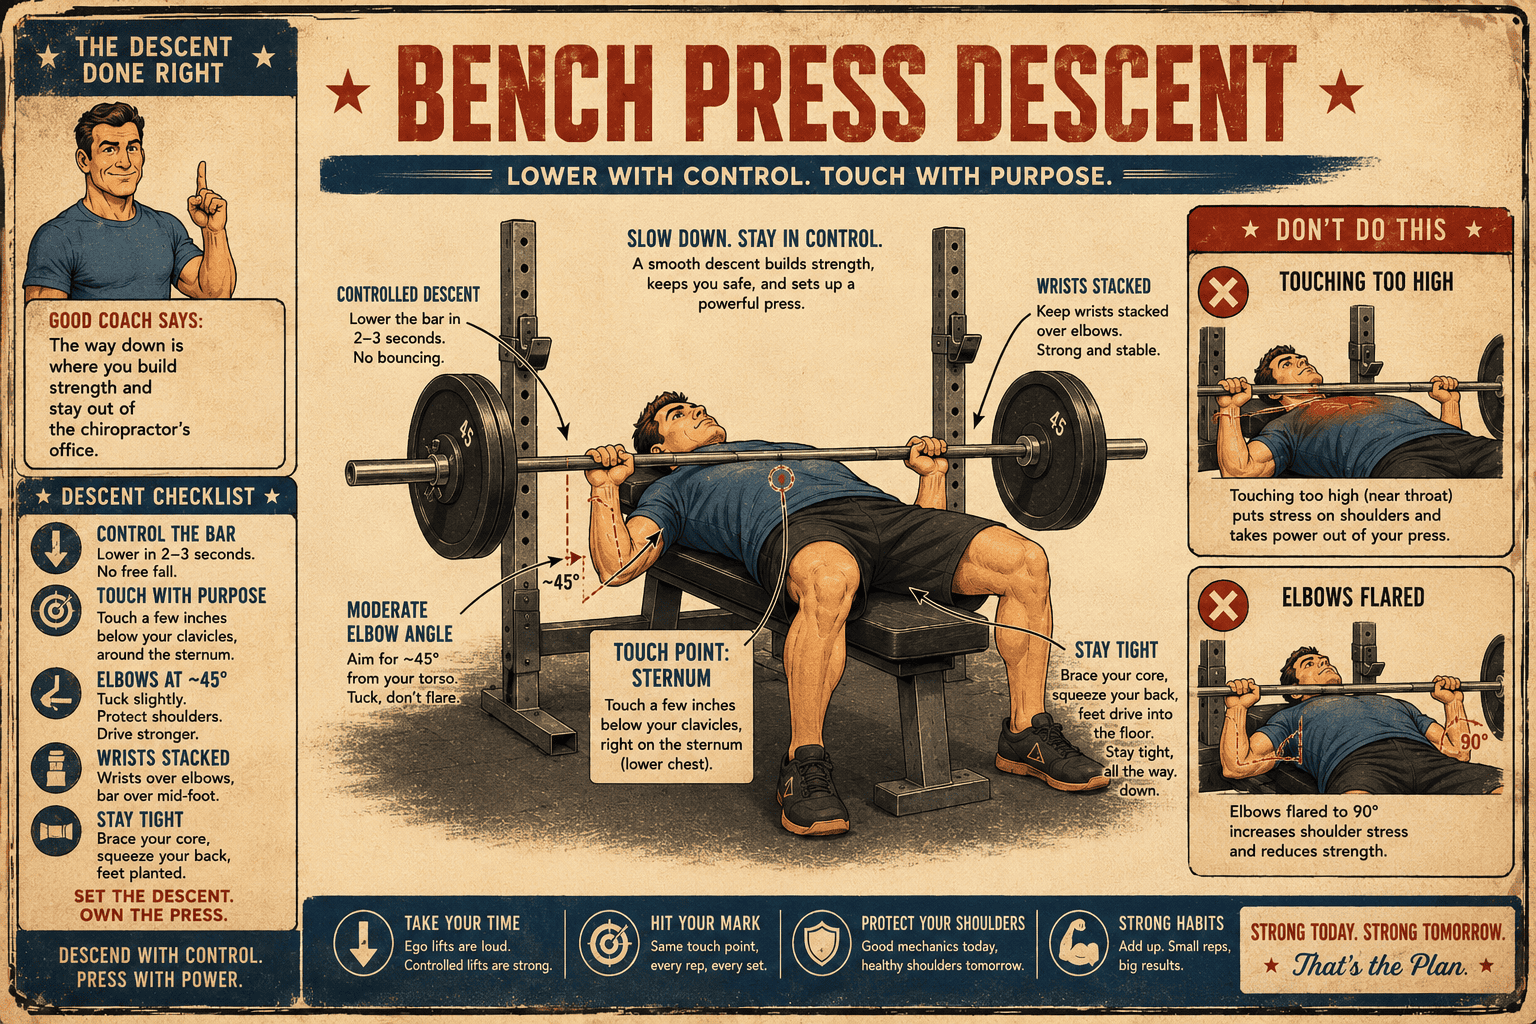
Elbow angle
The mechanical “best” position would be a 90-degree humeral angle, with the upper arms perpendicular to the torso. The bar would travel in a perfectly vertical line directly over the shoulders. This would also drive the humeral head (the ball at the top of your upper arm) straight into the acromion (the bony shelf on the shoulder blade that sits above it) and grind a hole in your rotator cuff over time (Ch. 5, “Elbows”).
So we compromise. The humerus stays at about 75 degrees from the torso at the chest, sometimes as low as 45 degrees for a lifter with a high arch and a chest-up sternum. The book’s Figure 5-15 is a good illustration of this: the higher the elbows flare, the closer to the throat the bar lands; the more they tuck, the closer to the belly. Pick the elbow angle that lands the bar where you want it to land.
The “elbows tucked to 45 degrees” cue you hear from some powerlifting sources is a tighter version of the same idea, but it’s easy to overdo. Greg Nuckols has argued that raw benchers often tuck too hard; the better shared idea is to keep the elbows under the bar and avoid a hard 90-degree flare. Rippetoe’s 75-degree default is more conservative, more general-purpose, and easier on the shoulders for someone still learning the lift.
Common failure mode: a 90-degree flare at the bottom. If you watch a commercial-gym bench from the side and the upper arms make a T with the torso, this is the position the shoulder surgeons thank for their summer homes. Pull the elbows in.
Staying tight on the way down
Rippetoe’s mental trick here is worth quoting:
Don’t think about lowering the bar; just think about driving it up. As you lower the bar down to your chest, you should be thinking about driving up hard, not about the descent. (Ch. 5, “Chest”)
This sounds like a tautology, but it changes the descent. If you think “down,” you relax; if you think “up,” you brace. The descent should feel like you’re loading a spring you’re about to release. The bar arrives at the chest under control, the upper back is still locked, the lats are still engaged, and the rebound out of the bottom is mostly muscle elasticity rather than ribcage compression.
The sports-science version of this is the stretch-shortening cycle. A muscle stretched under tension can produce more force on its concentric contraction (the shortening half - here, the press up off the chest), both from the elastic component of the tissue and from the stretch reflex mediated by muscle spindles (little sensors inside the muscle that fire when it gets stretched quickly, telling it to contract harder). Stronger By Science has discussed bench tempo, explosive intent, and the stretch reflex in benching; the practical point is that a touch-and-go bench preserves more rebound than a long pause, while a controlled descent matters for keeping position. A bouncing-off-the-ribcage descent isn’t the stretch-shortening cycle; it’s using your sternum as a trampoline, and it doesn’t transfer.
Eccentric tempo, the stretched position, and the explode
Rippetoe gives a workable window for descent speed: fast enough to use the stretch reflex, slow enough that the bar doesn’t arrive at the chest with momentum you have to decelerate against. If a heavy descent forces you to absorb the bar instead of using it, you went too fast. If you find yourself pausing on the way down because the descent feels effortful, you went too slow.
Mike Israetel and Renaissance Periodization emphasize a hypertrophy-focused version of the lift: full range of motion, a controlled eccentric, tension in the stretched position, and hard concentric intent. A useful version of that pattern has three parts:
- Controlled eccentric (the lowering half of the rep). Lower the bar under control. Not slow enough that fatigue becomes the point; slow enough that you stay tight, the pecs lengthen under continuous tension, and you arrive at the chest with the bar still moving but barely.
- Pause at the stretched position. Touch the chest and briefly stop. “The stretched position” is sports-science shorthand for the bottom of the rep, where the target muscle - here the pec - is at its longest length under load. This is probably an important part of the hypertrophy stimulus, and the pause reduces momentum so you can’t bounce out of it.
- Explode up. Drive concentrically with maximum intent. Same idea Rippetoe reaches for with “think about driving up,” but starting from a dead stop instead of from a stretch-reflex rebound.
The peer-reviewed literature behind training at long muscle lengths has built up over the last few years. Brad Schoenfeld and collaborators have published several reviews and primary studies in the Journal of Strength and Conditioning Research and European Journal of Sport Science on how range of motion and muscle length affect hypertrophy (Schoenfeld lab publications). Maeo and colleagues’ paper in European Journal of Sport Science, “Triceps brachii hypertrophy is substantially greater after elbow extension training performed in the overhead vs. neutral arm position,” is one prominent applied study supporting long-muscle-length training. Pedrosa and colleagues found that knee-extension partials performed in the more lengthened range produced greater regional quadriceps growth than shorter-range partials, with some advantages over full ROM at certain sites. Stronger By Science and Jeff Nippard have covered the same body of evidence for a general audience, while noting that the exact mechanism is still debated.
The short version of the research: current evidence generally favors training that loads a muscle at longer lengths, either through full range of motion or through lengthened partials, but the size of the advantage varies by muscle, exercise, and study design. For the bench press, touching the chest is the practical way to include the bottom, lengthened portion of the lift, though direct bench-specific hypertrophy evidence is limited.
This sits in some tension with Rippetoe’s touch-and-go preference. Pausing at the chest reduces the stretch-shortening contribution, which is part of why most people can move less weight on a paused bench than a touch-and-go bench. But the goals are different. Rippetoe’s bench is a strength lift programmed for novice progression, where maximum weight on the bar is the proxy for progress. The Israetel-style paused bench is a hypertrophy stimulus, where time under tension at long muscle lengths is the proxy.
In practice, you can have both. I like to do my main compound movement strength sets touch-and-go and my accessory bench work paused or super slow. If you only want one rule that travels: control the descent, touch the chest, and explode up. Whether you pause for a full second or just kiss the chest is a programming decision, not a technique decision.
A note on 1.5 reps, sparingly
A more aggressive variation that comes out of the same long-muscle-length research is the 1.5-rep method, sometimes called “stretched partials.” One rep looks like this: lower the bar to the chest, press it halfway up, lower it back to the chest, then press all the way to lockout. That entire sequence counts as one rep. The intent is to spend extra time in the lengthened position - the bottom half of the range - without giving up the full-ROM rep.
This is a stretched-partial overload tool, not a default. Use it sparingly. Some reasonable applications:
- As a finisher on a hypertrophy day, after your straight sets are done. Two or three sets of 6 to 8 1.5-reps at maybe 50 to 60 percent of your usual working weight will leave the pecs cooked in a way a normal accessory set won’t.
- As a stall-breaker on accessory bench variants (close-grip, incline, dumbbell) when you have plateaued and want to load the lengthened position more aggressively without shortening your full-ROM working sets.
- Programmed for a short block (two to four weeks), not as a permanent fixture. The technique is fatiguing enough that running it indefinitely usually backfires on recovery.
It isn’t appropriate for heavy strength work on the flat barbell bench. The pause-and-half-press pattern with a heavy load over your face turns a recoverable miss into an unrecoverable one. Save it for moderate-weight accessory work where a miss is dump-the-bar-on-the-pins survivable.
The peer-reviewed support for 1.5-rep training specifically is thin - I’m not aware of a direct head-to-head study of “1.5 reps versus straight sets” on the bench press. The mechanistic case rests on the broader stretched-partials and ROM literature. A useful 2023 review by Wolf, Androulakis-Korakakis, Fisher, Schoenfeld, and Steele found broadly similar adaptations between full and partial ROM training, with exploratory evidence that lengthened partials may be a useful hypertrophy option. Mike Israetel and Jeff Nippard have both covered lengthened partials; the 1.5-rep bench is one practical variant of that broader idea. The late John Meadows popularized similar bottom-half overload ideas in his Mountain Dog hypertrophy programs.
If you try it, count honestly. Three “1.5 reps” aren’t the same as five normal reps and shouldn’t go in your training log as such.
Drive
The descent is the part the bar is along for; the drive is the part you are paid for.
Off the chest
The first inch off the chest is where most missed reps die. Two coordinated actions have to fire at once: the legs apply force into the floor and channel it along the bench through the hips and lower back into the upper back, while the upper back keeps the shoulder blades pinned so the arms have a platform to push against. If the arch collapses at the touch point, the chest comes down to meet the bar, the shoulders shrug forward, and the lift falls apart in the next half-second.
Rippetoe describes the legs’ contribution as horizontal force along the bench, not vertical force off the bench (Ch. 5, “Lower back, hips, and legs”). Push your heels into the floor as if you were trying to slide yourself up the bench toward the rack, and let that force show up as reinforcement of the arch, not as the glutes leaving the bench.
A common powerlifting leg-drive cue is to push yourself back toward the head of the bench so the upper back stays pinned and the chest stays high. Same destination, different cue.
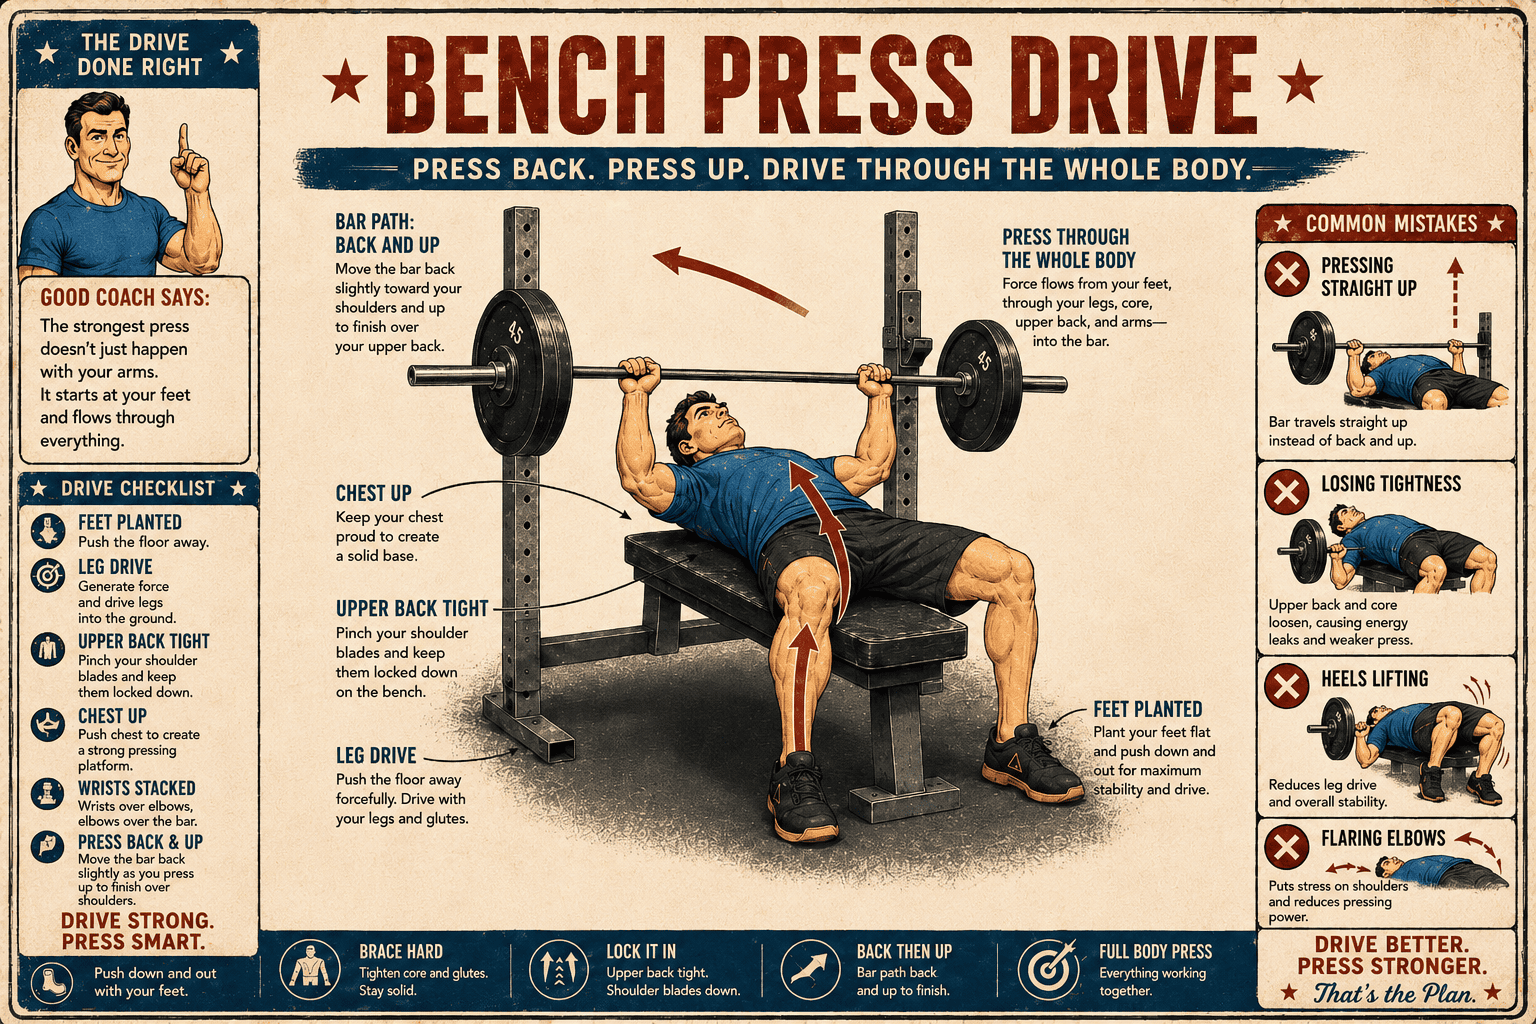
The bar path
The drive isn’t vertical. The bar comes up off the chest and slightly back toward a point directly over the shoulder joints. Rippetoe’s ceiling reference takes care of this: if your eyes are fixed on the spot above the start position, the bar will track to that spot, which is back and up from where it touched the chest. Coaches outside the Starting Strength tradition sometimes call this “J-curve” or “diagonal” bar path. It’s the same idea.
If the bar drifts forward toward the feet on the way up, the elbows are flaring out of position; check your tuck. If the bar drifts back toward the face, the elbows are over-tucked; let them open a little.
When it gets hard
The sticking point on a heavy bench is usually a few inches off the chest, where the pecs and front delts are at their weakest leverage and before the triceps are in a position to take over. If you grind through it, the bar speed will recover above the sticking point as the triceps engage; if you don’t, the bar will stall and start to drift, and you’ve already lost.
The cue that helps me most here is “press through the bar.” This is in the same family as external-cue and explosive-intent advice you’ll hear from powerlifting coaches: keep applying force at maximum effort through the sticking point, and don’t back off when the bar slows. The motor-unit recruitment evidence behind it is the standard force-velocity research.
Lockout
Finish every rep over the shoulders, with the elbows locked. Then, and only then, move the bar back to the rack.
Two of Rippetoe’s seven racking rules are violated most often:
Start and finish every rep from the start position over your shoulder joints. (Rule 3)
Never shove the bar toward the rack before the rep is finished. (Rule 4)
The reasoning for Rule 4 is the same as the reasoning for “no thumbless grip.” If you miss a rep with the bar angled back over your face, the bar lands on your face. If you miss a rep with the bar locked out over your chest, it lands on your chest, which is survivable. The five extra seconds it takes to finish the rep properly and then move it to the rack are the cheapest insurance in the gym.
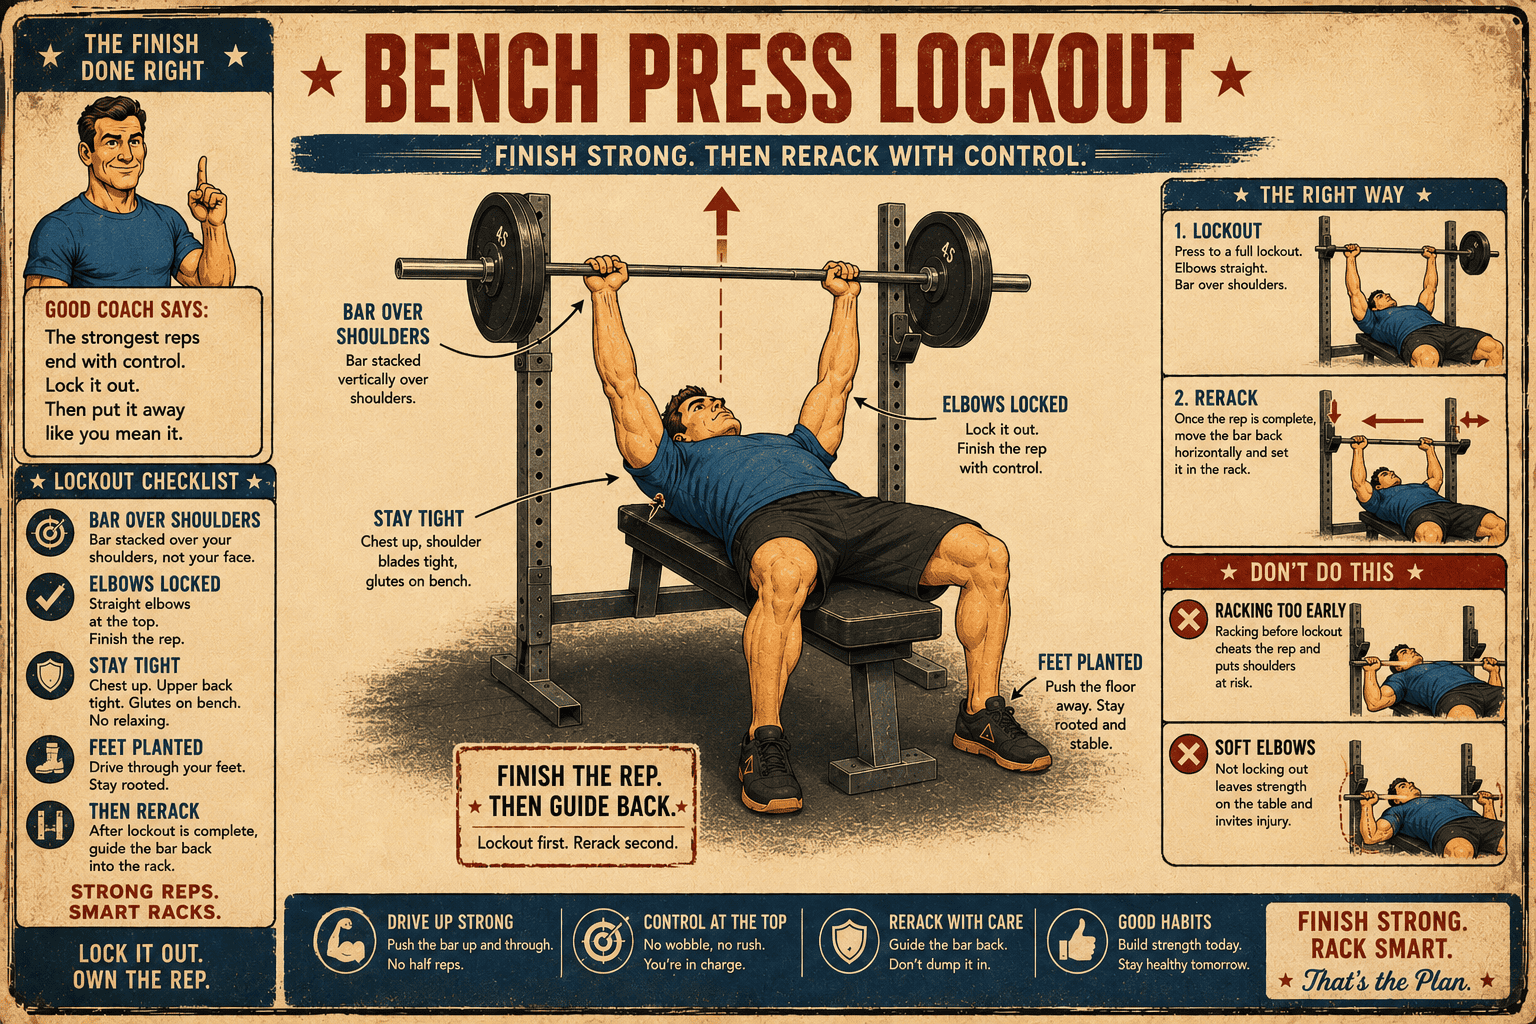
The rack-the-bar procedure: lock the elbows out over the shoulders, move the bar back with locked elbows until it touches the vertical face of the uprights, then slide it down into the J-cups. If you try to drop the bar onto the J-cups directly, you’ll eventually miss a hook, and that’s its own category of bad day.
Safety and spotters
The bench press has one of the clearest fatal failure modes in the weight room: a missed bar can trap the lifter across the neck or chest. Most of the acute danger comes down to two scenarios: the bar drops onto the lifter, or the lifter gets stuck under a bar with no way out. Rippetoe ends the chapter with racking and spotting rules for a reason.
A short list, mostly cribbed from him with my own emphasis:
- Bench in a rack with safety pins set just below chest height when training alone. This is the single most important safety choice you can make. Pins don’t fall asleep, get distracted, or arrive late; spotters aren’t always there and aren’t always paying attention.
- Do not collar the plates if you’re benching alone without pins. If you get stuck, your last escape route is to tilt the bar and let the plates slide off. Collars take that option away. Counterintuitive, but correct.
- Use one spotter, not two, for normal gym training. Two spotters can’t apply force evenly to the bar, and the resulting asymmetric loading is itself an injury risk. A center spotter standing behind the head, just out of your line of sight to the ceiling, is the standard configuration for ordinary work sets.
- A good spotter is invisible until needed. They hand off the bar, step out of your sight picture, watch the bar for real failure - not for “looking hard” - and step in only when the bar has stopped moving up or has started moving down. A rep “spotted” by a spotter who touched the bar doesn’t count in your log.
Rippetoe’s own startingstrength.com articles go deeper on spotting, pins, and what to do if you get pinned; Stronger By Science also discusses spotters, rack setup, and pin use in bench contexts. Worth the time.
Common problems
A few of the failure modes that come up most often, with the fixes I have seen work most consistently:
- Bar bounces off the chest. The descent is too fast and the upper back is loose. Slow the descent, and on the next rep, think “drive up” the whole way down so you arrive at the chest tight. Rippetoe also suggests touching “just the shirt,” which is a useful mental override while you rebuild the habit.
- Elbows flare to 90 degrees at the chest. Tuck. Cue: imagine your elbows pointing at your hip pockets, not at the wall. Drop the weight and rebuild the path; this isn’t a strength problem.
- Bar drifts toward the feet on the drive. Either the elbows are flaring out on the way up, or the eyes are tracking the bar. Re-anchor the ceiling reference and concentrate on the elbow position out of the bottom.
- Lost arch mid-set. The legs disengaged. Reset between reps: planted heels, glutes squeezed (without lifting), shoulders pinched and pulled toward the hips. If you can’t maintain the arch for five reps, the weight is too heavy or the warm-up was too short.
- Wrists hurt. Bar isn’t seated on the heel of the palm, or the grip is set by the knuckle line instead of by pronation. Re-rack the bar, reset the grip from the pronation cue, and check that the wrist is straight when you look up at the bar from the bench.
- Shoulders hurt. Elbows are flaring, or the arch and shoulder-blade tuck are absent. The 75-degree humeral angle exists for a reason. Squat University and the Stronger By Science shoulder library both have good background on impingement mechanics if you want to go deeper.
Closing thoughts
The most useful sentence in Chapter 5, for me, is the one about driving up while the bar is on the way down. It reframes the whole rep around intent and makes the descent into part of the press instead of part of the wait. Most of the rest of the chapter is mechanical detail in service of that one instinct: stay tight, push the bar away, finish the rep before you finish the set.
If you want a single rule of thumb to keep with you: never let the bar go anywhere you haven’t told it to go. Eyes on the ceiling, thumbs around the bar, pins under the chest, and the bar finishes where it started. The rest is practice.
Sources
- Rippetoe, Mark. Starting Strength: Basic Barbell Training, 3rd ed. With Stef Bradford. Wichita Falls, TX: The Aasgaard Company, 2011. ISBN 978-0-9825227-3-8. Chapter 5: The Bench Press. Section-name citations in this post (e.g., “Hands and grip,” “Elbows,” “Breathing”) refer to subsections within that chapter.
- Starting Strength (startingstrength.com) - Mark Rippetoe and the Aasgaard Company’s official site, with articles, video, and forum discussion that elaborates on the book.
- Stronger By Science (strongerbyscience.com) - Greg Nuckols and collaborators. Research summaries on grip width, bench mechanics, range of motion, tempo, and related programming.
- Squat University (squatuniversity.com) - Aaron Horschig, DPT. Physical-therapy framing of scapular retraction and depression, and of impingement mechanics.
- Juggernaut Training Systems (jtsstrength.com) - Chad Wesley Smith and coaches. Powerlifting-oriented technique writing and video.
- Renaissance Periodization on YouTube and renaissanceperiodization.com - Mike Israetel and collaborators. Programming and tempo guidance referenced for the controlled-eccentric, paused-stretched-position, explosive-concentric pattern.
- Jeff Nippard on YouTube - research-summary videos on lengthened-partial and full-range-of-motion training, accessible companion to the peer-reviewed literature below.
- Untamed Strength on YouTube - Alan Thrall. Starting-Strength-style technique tutorials and related bench setup/bar-path cues.
- IPF Technical Rules Book - competition specifications for powerlifting bars, bench height, legal bench grip, and bench-press performance rules.
- IWF Technical and Competition Rules and Regulations - competition barbell specifications for Olympic weightlifting.
- CPSC petition materials on weightlifting bench-press benches - incident-data review for bench-press asphyxia/anoxia hazards.
- Jumbelic, M. I. (2007). “Traumatic asphyxia in weightlifters”. Journal of Forensic Sciences, 52(3), 702-705. Forensic case-report evidence on bench-press asphyxia risk.
- Maeo, S., Wu, Y., Huang, M., Sakurai, H., Kusagawa, Y., Sugiyama, T., Kanehisa, H., and Isaka, T. (2023). “Triceps brachii hypertrophy is substantially greater after elbow extension training performed in the overhead vs. neutral arm position”. European Journal of Sport Science, 23(7), 1240-1250. Online ahead of print in 2022.
- Pedrosa, G. F., Lima, F. V., Schoenfeld, B. J., Lacerda, L. T., Simoes, M. G., Pereira, M. R., Diniz, R. C. R., and Chagas, M. H. (2022). “Partial range of motion training elicits favorable improvements in muscular adaptations when carried out at long muscle lengths”. European Journal of Sport Science, 22(8), 1250-1260.
- Wolf, M., Androulakis-Korakakis, P., Fisher, J., Schoenfeld, B. J., and Steele, J. (2023). “Partial vs full range of motion resistance training: A systematic review and meta-analysis”. International Journal of Strength and Conditioning. Useful review evidence for the broader lengthened-partials discussion.
- Schoenfeld, B. J., and collaborators. Reviews and primary studies on range of motion and muscle hypertrophy in the Journal of Strength and Conditioning Research and European Journal of Sport Science. A current publication list is on Brad Schoenfeld’s Google Scholar page.
Comments